

Janus Pro 7B is a future of multimodal AI that’s what coders believe. What’s your thought by the way?
I tried Janus pro 7b multimodal AI on my Windows system. It worked for me and was slow compared to the online version available on Hugging Face.
Read this blog to know how to access and use janus pro 7b locally, whether trying on Ubuntu or Windows system.
Also read: What Is Blooket? How To Sign Up, Create Question Set, Join Blooket, & More + FAQs (Part I)Table of Contents
How To Access Janus Pro 7B
There are multiple ways to access Deepseek janus pro 7b for users.
- Online using Hugging Face or Deepseek official website.
- By installing it locally on your computer.
Accessing online is faster and easier as you don’t need to wait for dependencies. While accessing janus pro 7b locally is a tedious job and requires coding skills.
I have explained how to install and run DeepSeek Janus Pro 7B multimodal AI model locally on Linux Ubuntu and Windows.
How To Install & Run Locally Janus Pro 7B On Linux Ubuntu
Developers mostly utilize Linux operating systems for testing and development. If that’s so, here’s how to run Deepseek Janus pro 7b locally.
I have used “bash” as a command line interface.
Step 1 – Install NVIDIA Drivers & CUDA
1. Check if your GPU is detected
!
nvidia-smi
2. If not, install CUDA & cuDNN
!
sudo apt update && sudo apt upgrade -y
sudo apt install -y nvidia-driver-535
3. Reboot your system
!
sudo reboot
Step 2 – Install Python & Virtual Environment
1. Ensure you have Python 3.10+ installed
!
sudo apt install python3.10 python3.10-venv python3-pip -y
2. Create and activate a virtual environment
!
python3 -m venv janus_env
source janus_env/bin/activate
Step 3 – Install Required Dependencies
1. Inside your virtual environment, install the necessary Python libraries
!
pip install torch torchvision torchaudio transformers accelerate auto-gptq
2. Test if CUDA is working with PyTorch
!
python -c “import torch; print(torch.cuda.is_available())”
If it prints True, CUDA is active
Step 4 – Download Janus Pro 7B
1. If the model is available on Hugging Face, download it
!
git lfs install
huggingface-cli login # (if needed)
mkdir models && cd models
git clone https://huggingface.co/janus/janus-pro-7b
2. Once downloaded, load the model in Python
!
from transformers import AutoModelForCausalLM, AutoTokenizer
import torch
model_path = “models/janus-pro-7b”
tokenizer = AutoTokenizer.from_pretrained(model_path)
model = AutoModelForCausalLM.from_pretrained(model_path, device_map=”auto”, torch_dtype=torch.float16)
# Run an inference test
input_text = “Explain the importance of AI in healthcare.”
input_ids = tokenizer(input_text, return_tensors=”pt”).input_ids.cuda()
output = model.generate(input_ids, max_length=150)
print(tokenizer.decode(output[0], skip_special_tokens=True))
Step 5 – Running Janus Pro 7B with a Web UI
1. If you prefer a no-code Web UI, install text-generation-webui
!
git clone https://github.com/oobabooga/text-generation-webui.git
cd text-generation-webui
pip install -r requirements.txt
2. Move the model files to the models directory, then start the server
!
python server.py –model janus-pro-7b
👉 Access the Janus pro 7b locally on the provided url.
How To Install & Run Janus Pro 7B Locally On Windows
If you are a windows user and want to try Janus Pro 7B locally utilizing hardware specifications, follow the mentioned steps.
Pre-requisites
👉 Download Anaconda from here,
👉 Email address to receive download link, and
👉 Good hardware specifications for smooth installation
Step 1 – Unpacking Anaconda Installer On Your Computer

Double click the installer to begin installation on your local computer. Select the path for installation and wait until its completion.
Step 2 – Create New Environment In Anaconda
Click on the “Environment” tab and at the bottom you will find the “Create” option. Click on it and name the environment, for example; I name it “Janus” and select Python 3.10.16 and click create.

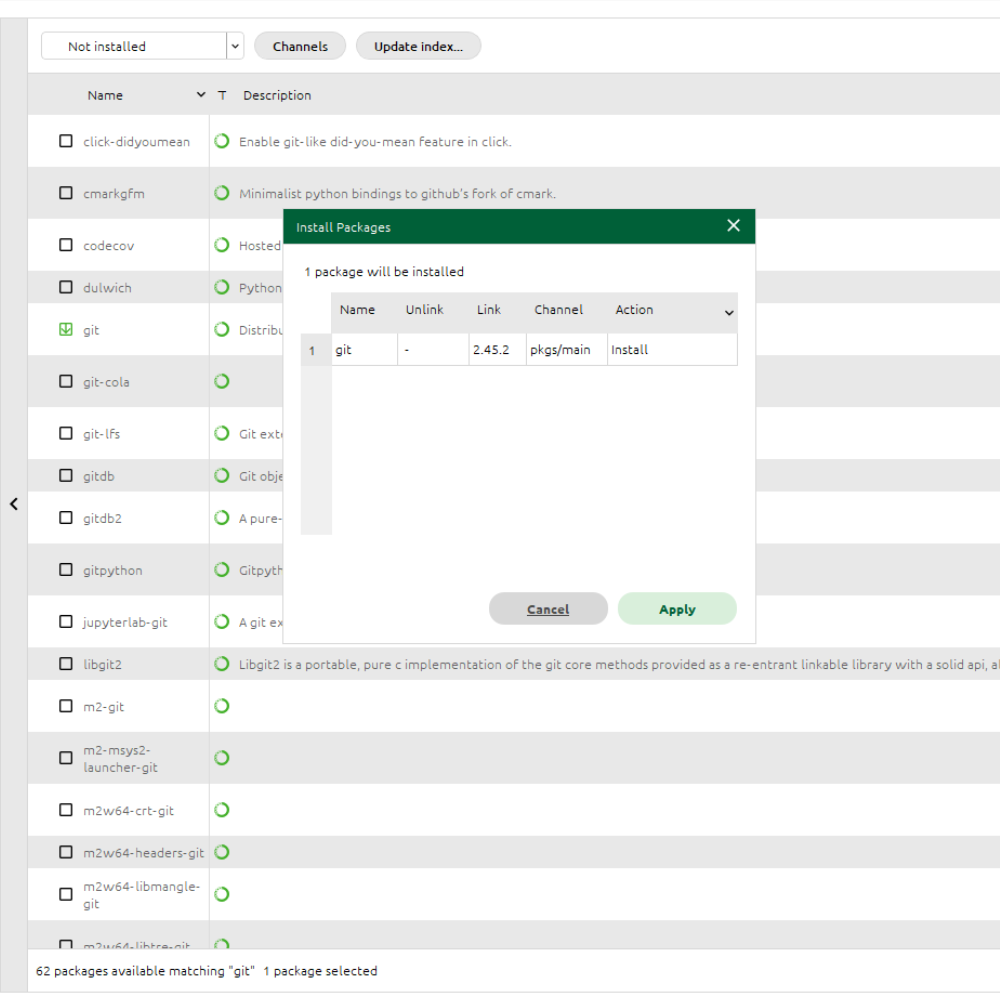
From the dropdown menu, select “not installed” and search “git” and check mark the file name with “git – Distributed version control system” and click the apply button.
Press the play icon next to Janus and tap “open terminal”. Type “cd c:\conda” to change the repository files for saving.

Step 3 – Download PyTorch
Go to pytorch.org and click get started. Select Pip as a Package and Compute Platform as CUDA 12.4 because it’s good with new GPUs.

Copy the command as shown and paste it back in the terminal. This will download and install PyTorch setup and help Conda to complete the installation easily.
Step 4 – Go To DeepSeek AI GitHub
Search for “DeepSeek AI GitHub” on the browser and open the github website. Find “Janus” which is a publicly available repository. Click to open its repositories.

Next, click on the “Code” option and copy the clone url and get back to the terminal. Type “git clone” and paste the url.

After cloning is done. Switch the folder to the downloaded repository. To do so, type “cd janus” and enter. It will change the folder to “(Janus) c:\Conda\Janus”

Step 5 – Installing In Web View Version
Head back to the DeepSeek GitHub and click on “Janus-pro” for the installation guide. Scroll down to this section “Gradio Demo” and copy the install command line code and paste it in the terminal.

Wait a few seconds to complete the installation in the terminal. Now you are almost done.
You may see “python demo/app_Januspro.py” automatically added. It is the same code available in the DeepSeek github.
Simply press enter to continue the installation.

In some cases, you may see an error saying about OSError: We couldn’t connect to ‘https://huggingface.co’ to load this file.
Tip: Try resolving this error through this link.
Step 6 – Running Janus Pro 7B Locally
After the installation completes successfully, you will have the url to run it locally in a web version.

The interface and experience is similar to the original Janus pro 7b AI model. However, the response is highly dependent on the technical specifications of the hardware you are using.
In my case, it’s a bit slow. It took 4 minutes to generate an image from text.
!
Janus Pro 7B Download
There is a possible way to download Janus Pro 7B using Hugging Face. Create an account and search for Janus Pro 7B model with the name of Deepseek.
Now begin downloading files by tapping into the ‘files and version’ section. Next, use Git and Transformers library to clone and later install the required dependencies using Python’s transformers.
After this, follow the usage instructions on the repository page. You might require integrating the model with Python code.
In Conclusion
Well, Janus pro 7B is an advanced multimodal AI which locally requires some technical setup. Here’s my recommendation for smooth installation and running Janus Pro 7B locally.
GPU: NVIDIA GPU with at least 12GB VRAM, however more is better.
RAM: Minimum 16GB (preferably 32GB for handling larger workloads)
Storage: At least 30GB of free space.
Though I have lower specifications, I have noticed big lags and longer waiting time for image generations. Therefore, before thinking of trying it locally, you must have recommended specifications available.
That’s all in this blog. Thanks for reading 🙂
Author’s Recommendation:
👉 Architecture Of Janus Pro 7B
👉 Janus Pro 7B vs Stable Diffusion
Frequently Asked Questions
Can I use janus pro 7b without online?
Yes, by setting up janus pro 7b locally you may use it actually without accessing online on hugging face or its official website.
Is there a way to run janus pro 7b locally?
By using github repository you can run Janus pro 7b on linux-based operating system as well as Windows based.
Do I need technical skill running deepseek multimodal AI locally?
Yes, knowledge of Python and basic coding skills are required to install Janus pro 7b offline.
What is the response rate of image generation when running janus pro 7b locally?
The response rate is usually slower because of the restricted hardware specification. It requires a heavy hardware system, for example 16GB of vRAM and 30+ GB of disk space and i7 or Ryzen 7 processor.
Sources:
https://github.com/deepseek-ai
https://pytorch.org/
https://huggingface.co/deepseek-ai
Disclaimer: The information written on this article is for education purposes only. We do not own them or are not partnered to these websites. For more information, read our terms and conditions.
FYI: Explore more financial tips and tricks here. For more tech tips and quick solutions, follow our Facebook page, for AI-driven insights and guides, follow our LinkedIn page.
Top 10 News
-
01
Top 10 Deep Learning Multimodal Models & Their Uses
Tuesday August 12, 2025
-
02
10 Google AI Mode Facts That Every SEOs Should Know (And Wha...
Friday July 4, 2025
-
03
Top 10 visionOS 26 Features & Announcement (With Video)
Thursday June 12, 2025
-
04
Top 10 Veo 3 AI Video Generators in 2025 (Compared & Te...
Tuesday June 10, 2025
-
05
Top 10 AI GPUs That Can Increase Work Productivity By 30% (W...
Wednesday May 28, 2025
-
06
[10 BEST] AI Influencer Generator Apps Trending Right Now
Monday March 17, 2025
-
07
The 10 Best Companies Providing Electric Fencing For Busines...
Tuesday March 11, 2025
-
08
Top 10 Social Security Fairness Act Benefits In 2025
Wednesday March 5, 2025
-
09
Top 10 AI Infrastructure Companies In The World
Tuesday February 11, 2025
-
10
What Are Top 10 Blood Thinners To Minimize Heart Disease?
Wednesday January 22, 2025
Related Posts

Review
How Mechanical Failures Lead To Truck Accidents
By: Ankita Sharma, Fri June 5, 2026
When large trucks cause accidents, establishing a mechanical failure isnre..

Review
How To Manage Your Screens Remotely (And Scale Digital Signa...
By: Gulfia , Mon May 11, 2026
Managing screens across multiple locations used to be a logistical nightmare...

Review
What Is Global Market Analysis Through Zlibrary And How Does...
By: Neeraj Gupta, Sun March 8, 2026
High-quality market intelligence is precious, fragmented, and often locked..
Review
Is AWS Transform For Legacy Java Applications Worth It For D...
By: Neeraj Gupta, Sun March 8, 2026
If your legacy Java application collides with large datasets, batch processing..

Review
Why Traditional IVR Call Routing Fails With Complex Customer...
By: Neeraj Gupta, Sat March 7, 2026
Customer support systems are designed to streamline communication, decrease..

Review
The Benefits Of Using Personalised PAT Test Labels For Profe...
By: Ankita Sharma, Fri January 30, 2026
Personalised PAT test labels are crucial elements in maintaining compliance and..
Subscribe
0 Comments